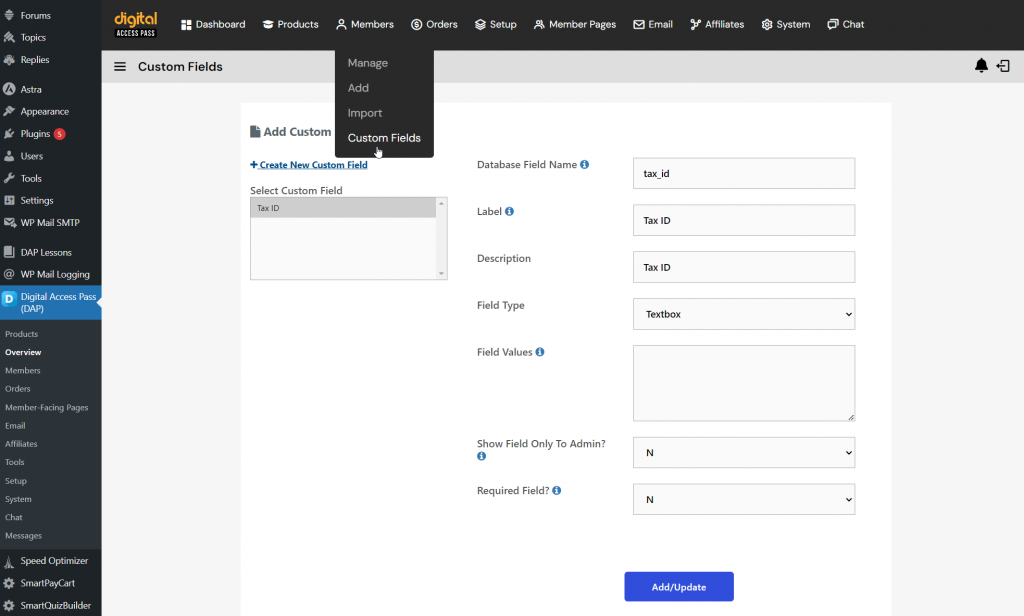
DAP allows you to create custom fields to collect additional information from users during signup, registration, or checkout. These fields can be managed in the DAP admin panel and can be used within automated email messages through merge tags.

Here’s how to define and manage custom fields in DAP:
Steps to Create Custom Fields in DAP
Step 1: Access the Custom Fields Section
- Log in to your DAP admin panel.
- Navigate to Members -> Custom Fields.
- Click on Add New Custom Field to create a new field.
Step 2: Define the Database Field Name
Enter a unique Database Field Name for the custom field.
Important: Make the database field name all lowercase, with no spaces, hyphens, or special characters.
Step 3: Set the Label (User-Facing)
- Enter a Label for the custom field.
- This label will be visible to users on the signup, registration, or profile pages.
- Make the label descriptive so users understand the purpose of the field (e.g., Social Security or Tax ID).
Step 4: Add a Description (Admin-Only)
Enter an optional Description for the field. This is for admin reference only and will not be visible to users.
Step 5: Select the Field Type
Choose a Field Type for the custom field. The available options are:
- Textbox: A single-line text input for short data (e.g., name, ID number).
- Textarea: A multi-line text area for longer data (e.g., descriptions).
- Dropdown: A list of predefined options from which users can select one.
- Checkbox: Allows users to check one or more options.
- Radio: Allows users to select only one option from a group.
Step 6: Enter Field Values (If Applicable)
If the selected field type is Dropdown, Checkbox, or Radio, enter the possible values that users can choose from. For a Textbox or Textarea, no predefined values are required.
Step 7: Configure Visibility
- Set Show Field Only To Admin:
- Set it to “Y” if you want the field to be visible only to admins.
- Set it to “N” if you want the field to be visible and editable by users during signup or on their profile.
- Save the custom field.
Step 8: Set Required Field Option
Required Field: If you want to ensure that users must fill out this field during signup or registration, set the Required Field option to Yes.
Managing Custom Fields in DAP Forms
Once the custom fields are defined, you can display these fields in DAP registration form, or SPC checkout forms. When users submit these forms, the data will be stored and available for viewing and managing in the DAP admin panel under each user’s profile.
Using Custom Fields in DAP Emails
DAP supports the use of custom field values in emails (autoresponders or broadcast emails) via merge tags, allowing for personalized communication.
Steps to Use Custom Fields in Emails:
- Define a custom field in DAP following the steps above.
- In your email template, use the merge tag associated with the field.
- For example, if you have created a custom field called tax_id (database name), then to include this field in the autoresponder/broadcast email, just add this – %%custom_tax_id%% to the body of your email.
By setting up custom fields in DAP, you can collect detailed information from your users, manage it efficiently, and create personalized email communications using the stored data.
Allowing Members to Update Custom Field Details in DAP Member Profile Page
To enable users to update their custom field details on their DAP member profile page created using DAP’s Member Page Builder, follow these steps:
- Access DAP Admin Panel and Navigate to All Member Pages.
- You will find a list of all member-facing pages listed in a table.
- Find and edit the Member Profile Page in the Member Pages section.
- Enable Additional Fields:
- In the Customizer tab, locate the option for Additional Fields.
- Enable this option to allow custom fields to be displayed on the member profile page.
- Show Custom Fields:
- Look for the Show Custom Fields option
- Set this option to On to display the custom fields on the member profile page.
- Select Custom Fields:
- Under the Select Custom Fields dropdown menu, choose the specific custom fields you want to allow members to update.
- You can select all available custom fields or specific ones based on your requirements.
- Save Changes:
- After configuring the custom fields settings, make sure to save the changes to apply the updates.
Once configured, users will see the selected custom fields on their member profile page and can update the information as needed. This feature will allow members to maintain their profiles and keep their information up to date.


