Important Note:
The autoresponder dripping operates in real time. If you have users on Day 3 during your testing, only the emails scheduled to drip on Day 3 will be sent. Users on Days 1, 2, or 4 and beyond will not receive those emails.
Example:
Say that you have an autoresponder email scheduled to drip on Day 2 of membership, and today is October 6, 2024.
- Check the User’s Access Start Date:
- You find a user, John Doe, in the DAP Members >> Manage page.
- John’s access start date for the membership product is October 5, 2024.
- Is John Eligible to Receive the Email?
- Since John’s access started on October 5, today, October 6, 2024, is Day 2 for him. He will receive the Day 2 email scheduled for today when the cron runs at midnight (start of day 2).
- Another Scenario:
- If John’s access start date was October 6, 2024 (today), he will not receive the Day 2 email today, as today is Day 1 for him. He will receive the Day 1 email instead, and the Day 2 email will be sent tomorrow (October 7).
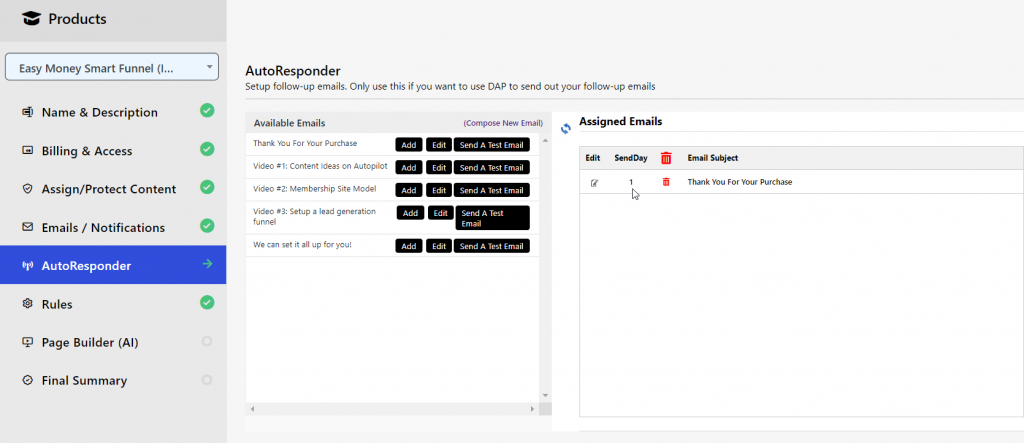
Step 1: Check Email Dripping Day
✅ Verify the day of the email you expect to be sent.
Drip setting for the autoresponder email can be found in the DAP Products page > Autoresponder tab.

✅ Verify User’s Access Start Date
Find the user in the DAP Members >> Manage page.
Check the user’s access start date associated with the product. This date indicates when the user received access to the product and will help you confirm whether they are eligible to receive the email on the scheduled drip day. If the access start date is before or on the day of the email drip, that user will be eligible to receive the email. If the access start date is after the scheduled drip day, they will not receive that specific email.
Step 2: Verify Cron Job Setup
Ensure the cron job is set to run once every hour at the top of the hour. You can check the cron status in DAP System > Job Queue (towards top right section).
Step 3: Add a Test User
- Navigate to the DAP Admin panel and select the “Add Member” page.
- Give user access to the product you are testing.
Step 4: Check User Status
- Go to the DAP Admin -> Manage Users page.
- Confirm that the user’s status is A (Active) and the product status is also A.
Step 5: Wait for Cron to Run
- Wait until the top of the hour for the cron to run.
- Check the email of the newly added user to see if the Day 1 email has arrived.
Step 6: If the Email Does Not Arrive
- Adjust Log Level
- Set the DAP setup configuration to a log level of “log all details”. You can do this in DAP setup >> config page.
- Delete and Re-add User
- Go to DAP -> Manage Member, select the newly added user, and select “Delete” from “Bulk Action”. Delete the user.
- Add the same user again, following steps 3 and 4.
- Clear Log Content
- Go to DAP System -> Logs and empty the log content to ensure a clean log for the test.
- Run Cron Manually
- Execute the cron manually by entering the following URL in your browser:
http://yoursite.com/dap/dap-cron.php
(Replaceyoursite.comwith your actual site name.)
- Execute the cron manually by entering the following URL in your browser:
- Check Logs
- Return to DAP System -> Logs and review the log content. If needed, open a DAP support ticket and provide the log snippet.
- Check User Email Again
- Check the email for the user you are dripping on Day 1 to see if the email has arrived.
If the email still does not go through, please open a DAP support ticket with all the details and your DAP log snippet for further troubleshooting.


