Email SMTP Integration in DigitalAccessPass (DAP)
By default, DAP uses your web host’s SMTP service (PHP mailer) to send emails. However, for more reliable email delivery, you can configure DAP to connect with your own external Email SMTP service.

This guide walks you through the steps to configure and manage your SMTP settings within DAP.
Step 1: Access SMTP Settings in DAP
- Log in to your DAP admin panel.
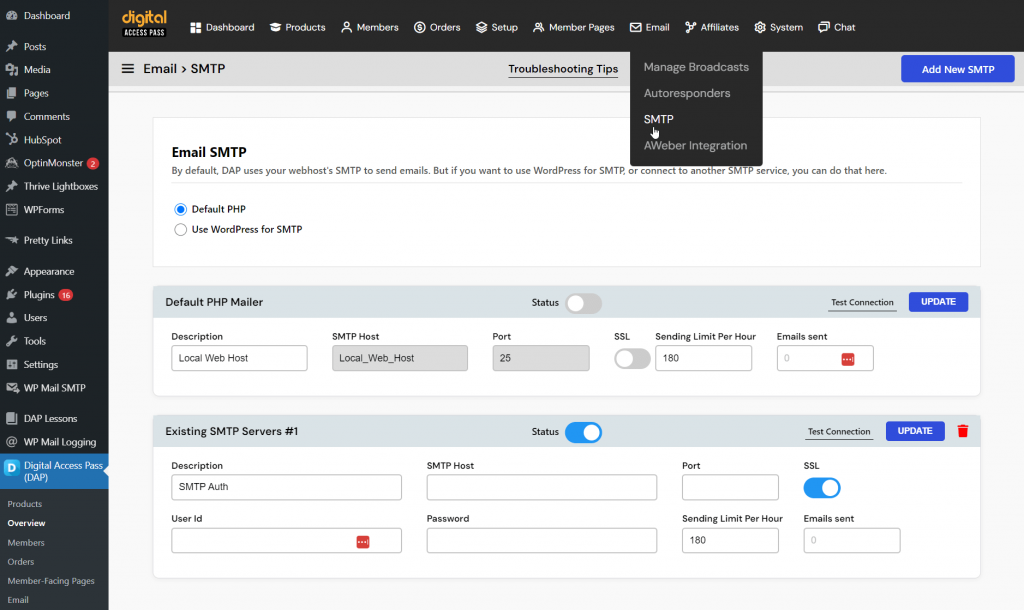
- Navigate to DAP Admin Menu → Email → SMTP.
Note: By default, DAP uses the PHP mailer, which is enabled out-of-the-box.
Step 2: Add a New SMTP Connection
If you wish to connect DAP with your own SMTP service (like Gmail, SendGrid, Amazon SES, etc.), follow these steps:
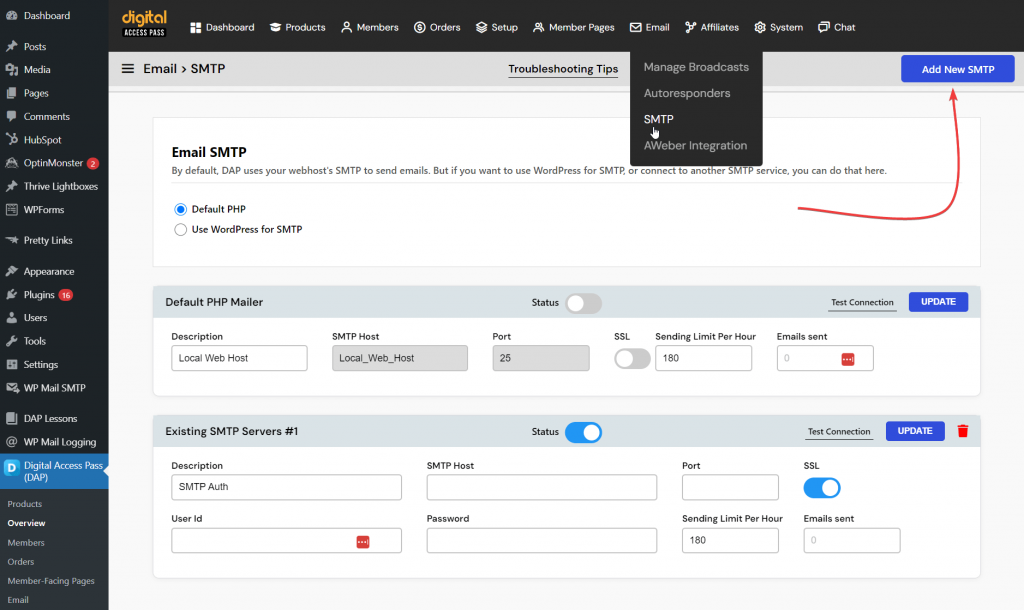
On the SMTP Settings page, click Add New SMTP Connection.

Important: You can set the “From Email” and “From Name” in DAP Setup >> Config page. Use a domain-based email in the From Email field. This is important because it improves email deliverability and reduces the chances of your emails being marked as spam. Many email providers and spam filters are more likely to block or filter emails sent from free, non-domain-based addresses (like Gmail or Yahoo).
Fill in the required SMTP details:
- Description: Give a name to this SMTP connection for easy reference.
- SMTP Host: Enter your SMTP server’s host address (e.g., smtp.gmail.com).
- Port: Specify the port number your SMTP service uses (e.g., 465 for SSL, 587 for TLS).
- SSL/TLS: Choose the security protocol for this connection (SSL or TLS).
- User ID: Your SMTP service login username (usually the email address associated with the service).
- Password: The password for the above username.
- Sending Limit Per Hour: Some SMTP services limit the number of emails you can send per hour. Enter the allowed limit here to avoid surpassing it.
- Emails Sent: Displays the number of emails sent via this SMTP connection.
Step 3: WordPress for SMTP
If you have connected WordPress to your SMTP platform and just want DAP to use the same, you can do that too.
Just select the WordPress for SMTP option in the DAP Email >> SMTP page.
Step 4: Test the SMTP Connection
Before activating your new SMTP connection, it’s important to ensure everything is configured correctly:
- After entering the SMTP details, click on Test Connection.
- DAP will send a test email to verify the configuration.
- If successful, you’ll see a confirmation message indicating the connection is working.
- If there’s an error, double-check your SMTP credentials and settings, then test again.
Step 5: Enable the SMTP Connection
Once your test is successful, follow these steps to enable the connection:
- Under the SMTP Connections list, locate the SMTP service you just added.
- Toggle the switch to Enable this SMTP connection.Important: Enabling your custom SMTP service will automatically disable the default PHP mailer.
- Click Save to apply the changes.
Step 6: Disable Default SMTP (Optional)
If you’re using a custom SMTP connection, you may want to completely turn off DAP’s default PHP mailer. Here’s how:
- Go to DAP Admin Menu → Email → SMTP.
- Under Default PHP Mailer, toggle the switch to Disable.
Tips for Better Email Deliverability
- SPF and DKIM: Ensure your domain’s SPF and DKIM records are properly configured to improve email deliverability.
- Use a Trusted SMTP Service: Consider using a reputable SMTP provider like Amazon SES, SendGrid, or Mailgun for improved inbox placement.
By configuring your own SMTP service in DAP, you ensure better control over your email deliverability, allowing you to bypass potential limitations imposed by your web host’s email servers. Always monitor your email sending limits to stay within the constraints of your SMTP service.


